iPhone Data Recovery
 Phone to Phone Transfer
The easy 1-Click phone to phone data transfer to move data between iOS/Android/WinPhone/Symbian
Restore-iPhone-Data Products Center

 Android Data Recovery
The Easiest Android data recovery software to recover Android lost or deleted Files
 Phone Manager(TunesGo)
Best iOS/Android phone manager tool to manage your phone’s files in a comfortable place
 Phone to Phone Transfer
The easy 1-Click phone to phone data transfer to move data between iOS/Android/WinPhone/Symbian

iOS Toolkit
A full solution to recover, transfer, backup restore, erase data on iOS devices, as well as repair iOS system and unlock iPhone/iPad.

Android Toolkit
All-in-one Android Toolkit to recover, transfer, switch, backup restore, erase data on Android devices, as well as remove lock screen and root Android devices,especially Samsung phone.
“Now I have a new iPhone 7 Plus in hand and I need to transfer pictures from PC to my new device, but iTunes still keeps warning me that it will erase my iPhone. Is there a way to transfer photos from PC to iPhone 7 Plus without data lost?”
Maybe you have backed up some data including photos, videos, music from your old phone to computer before. And now, you can not wait to transfer those music, videos and photos, apps to the brand-new iPhone 7 or iPhone 7 Plus for better enjoying the newest and attractive smartphone.
If you want to copy meaningful photos to iPhone 7/7 Plus on iOS 10 or iPhone 6S/6, iPhone 5S/5C/5, iPhone 4S/4 with iOS 9.3.5/9.3/9/8, there is no doubt that the first solution come to our mind is using iTunes. However, they need to pay attention to the transferring process since it might delete the existing pictures on their iPhone 7/7 Plus.
Free download the iOS & Android Manager program, You can transfer photos to the Photo Library of iPhone 7/7 Plus from computer/iTunes/old phone at once, and you won’t lose any existing data or file during syncing. Now plug the USB cable to connect your iPhone 7/7 Plus to PC, and learn to sync photos in 3 steps right now!
Key Features of iOS Transfer Program:
– Supports transferring up to 24 kinds of iOS data, like Photos, Videos, Music, Messages, Contacts, Notes, etc.
– Freely add photos to iPhone 7 without erasing any data.
– Also supports extractting photos from iCloud or iTunes bakcup without restoring iDevice.
– Super fast speed to make you transfer hundreds of photos in a few minutes.
– Compatible with iPhone 4/4s/5/5s/6(Plus)/6s(Plus)/SE/7(Plus).
Step 1.Free Download the Program on PC
Launch the iOS Transfer tool on your computer, and connect your iPhone 7/7 Plus to the computer via its USB cables. Then you will see the following main interface.
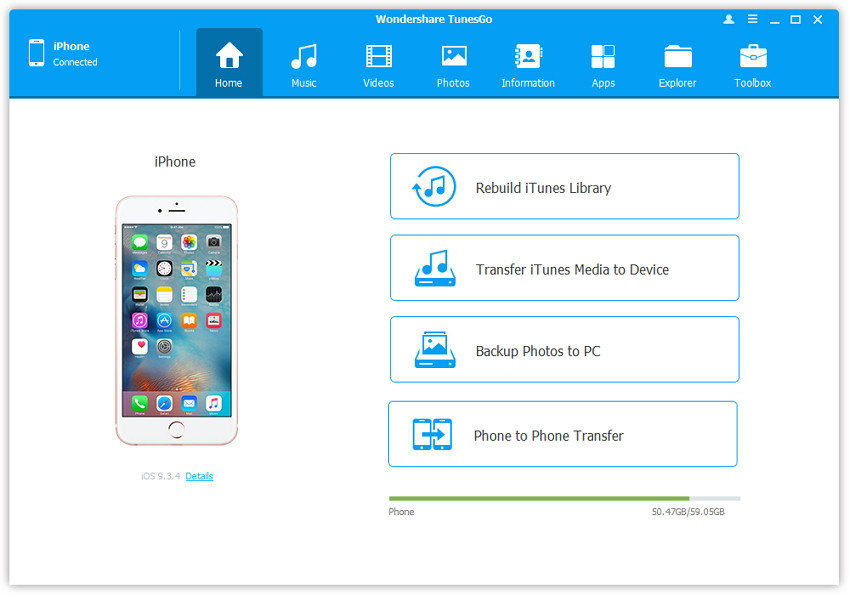
Solution 1. Transfer Photos Using Buttons
Step 2.Add Photos from Computer to iPhone 7
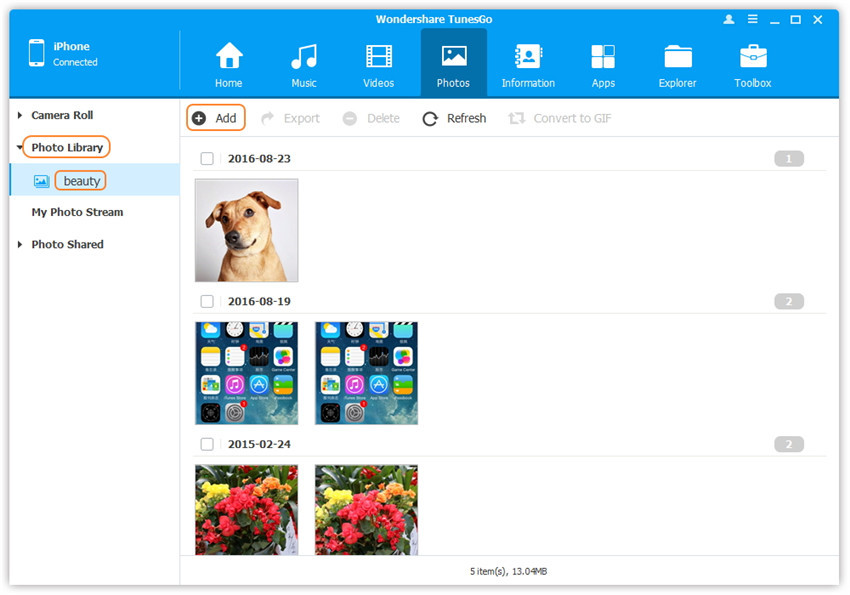
Tap on Photos icon then select the specific option Photo Library.
Note: Camera Roll, Photo Stream and Photo Shared are not available to add photos.
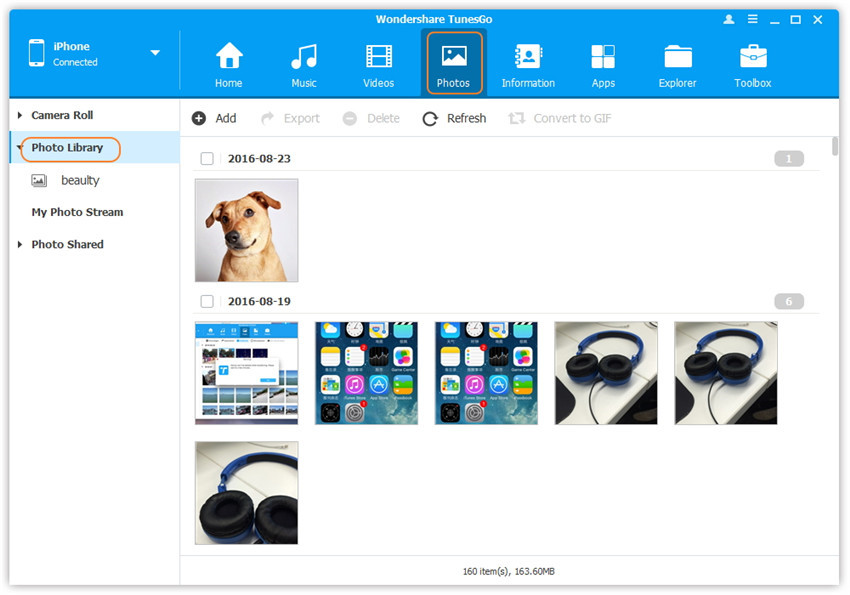
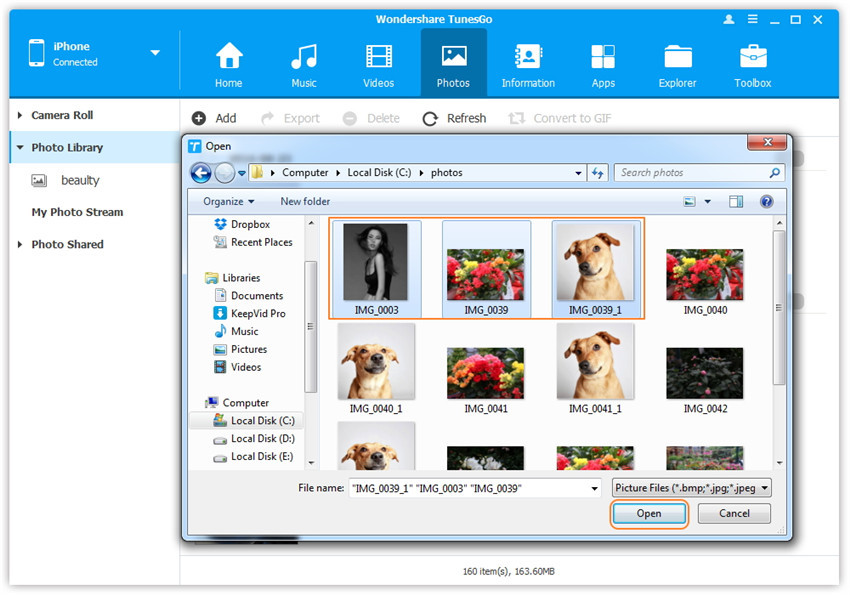
Next, click Add and then select Add File or Add Folder to add photos from your computer. If you only want to select some photos, then click Add File, and then hold down Shift or Ctrl key to choose multiple photos; Or if you want to transfer all the photos in one folder, then click Add Folder.
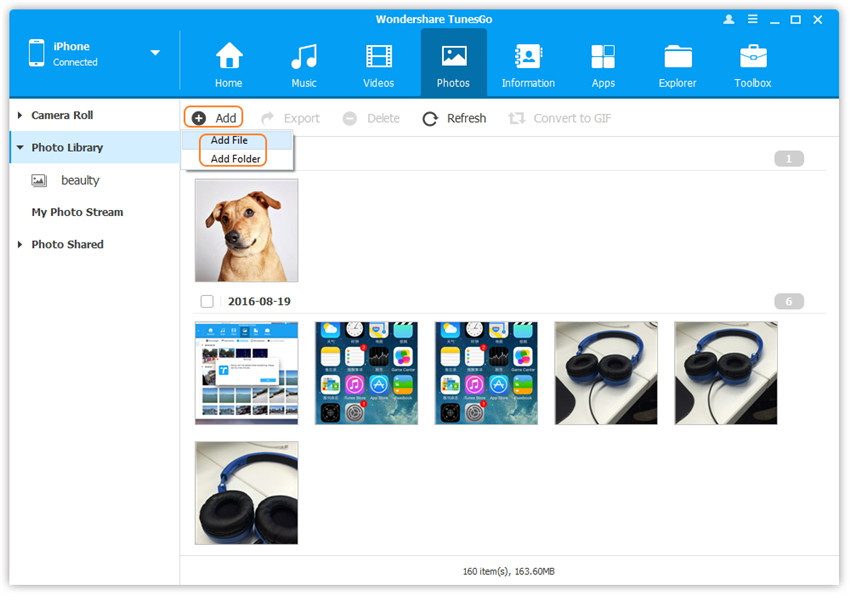
Step 3.Transfer Photos from PC to iPhone 7/7 Plus
Take add photos to iPhone by clicking Add File as an example. After that, click Open to import the selected photos to your iPhone 7 device.
Solution 2. Transfer Photos by Drag and Drop
Step 2.Find Photos on your Computer
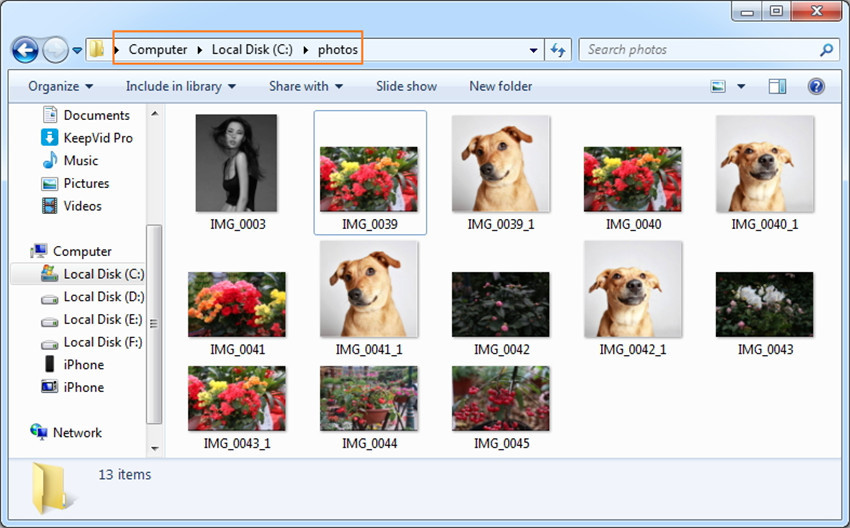
After running the program on your PC and connect iDevice to computer, you need to find and open the photo folder on your PC or Mac which includes the photos that you wish to transfer to iPhone 7/7 Plus.
Step 3.Export Photos to iPhone 7 by Drag and Drop
Next, click “Photos” and go to the Photo Library window. Drag and drop the selected photos from your PC to the Photo Library window of iOS Transfer tool.

No matter solution 1 or solution 2, you can also select to add photos to one of the photo albums under Photo Library.
Method 1. Backup/Transfer Photos from iPhone 7 to PC/Mac in 1-Click
Step 2.Backup/Transfer iPhone Photos to Your Windows PC/Mac
As a Windows PC user
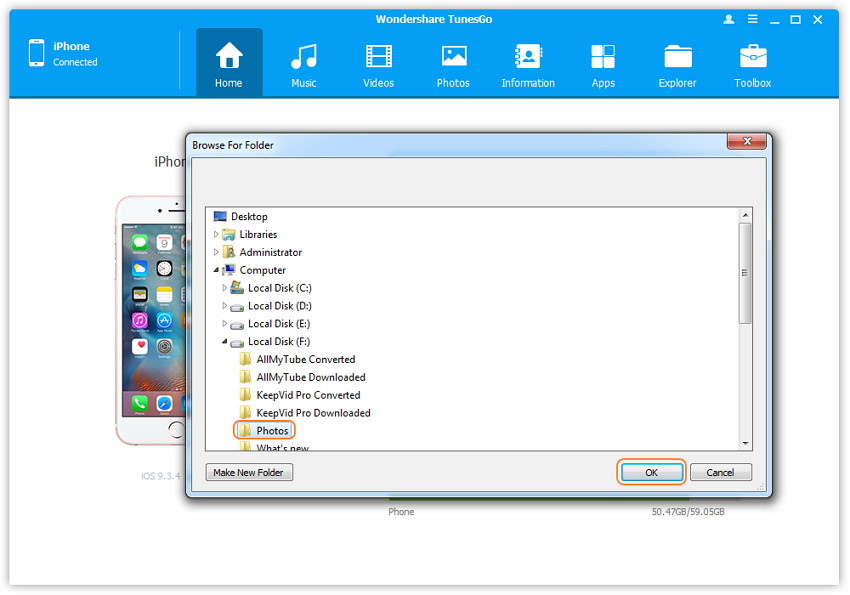
Select this “Backup Photos to PC” option from the main interface.
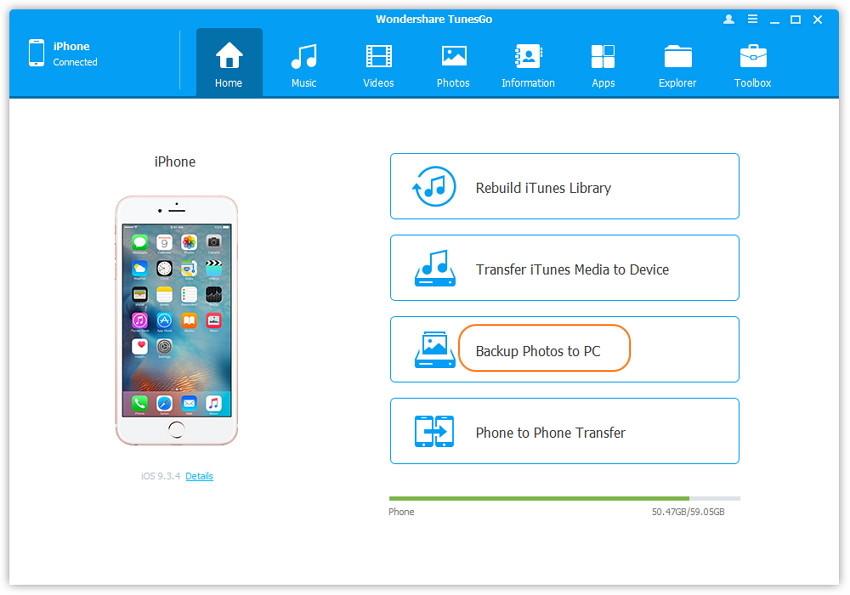
In the next step, browse and select the destination folder for photos, click “OK” to start exporting photos to your computer.
As a Mac user
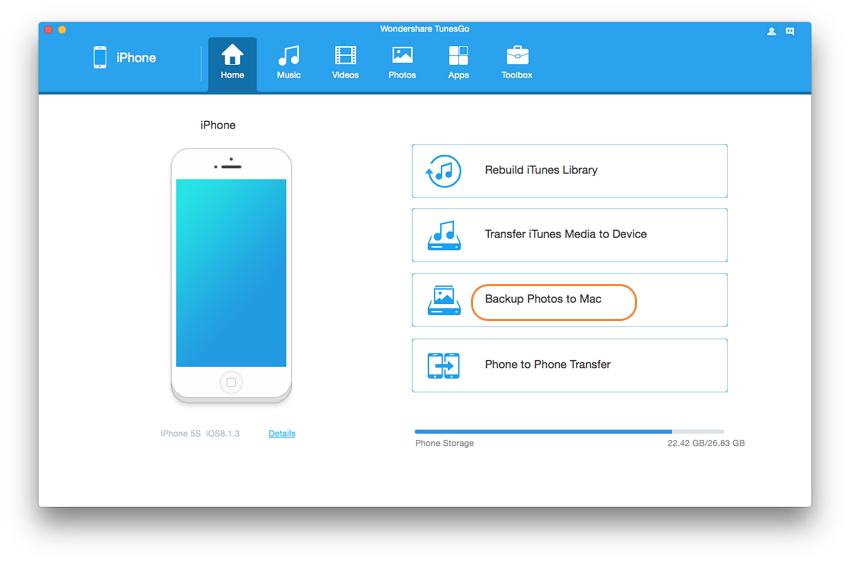
The same, click on the main interface of the “Backup Photos to Mac” option.
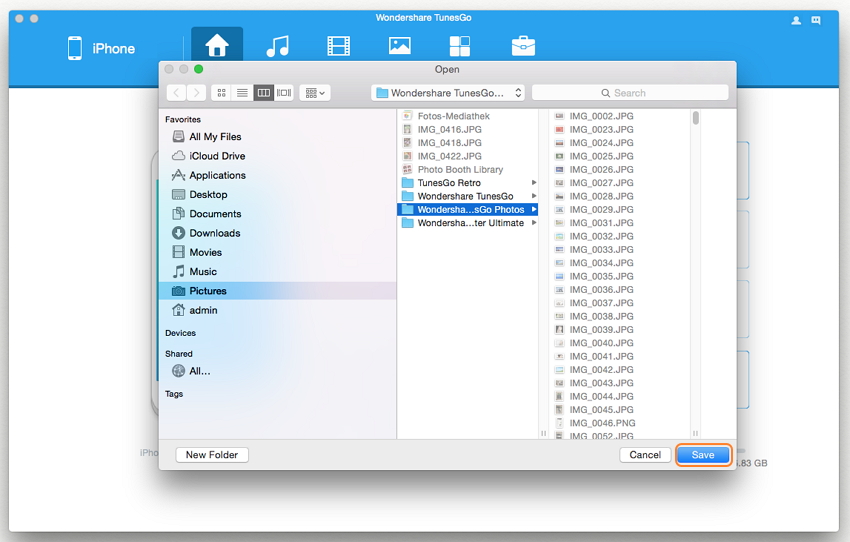
Browse and select the destination folder for your photos, and then click “Save” to begin the export process from the pop-up window.
Step 3.Successfully Export Photos to Windows PC/Mac
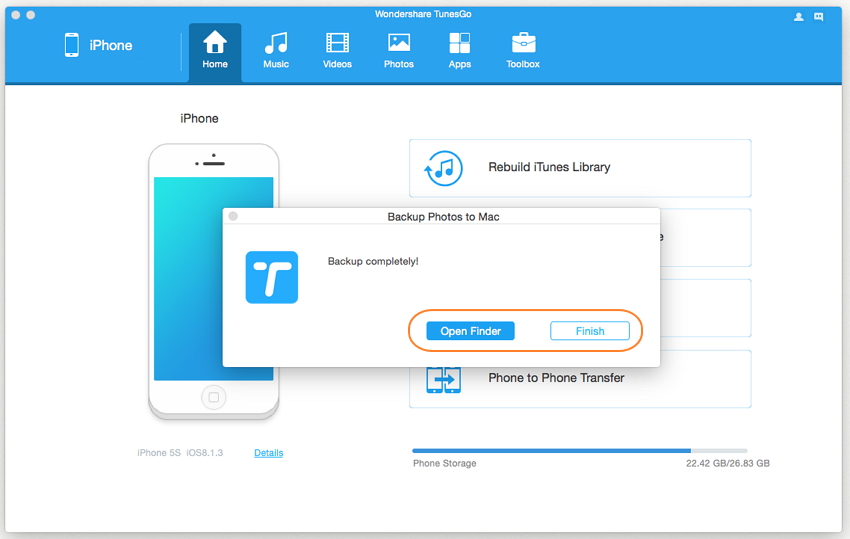
Finally, simply click “Open Folder” to view the exported photos on the selected path of the computer, or you can click “Finish” to close the dialog box.
Method 2. Transfer Selected Photos with Buttons
Step 2.Select Photos Tab
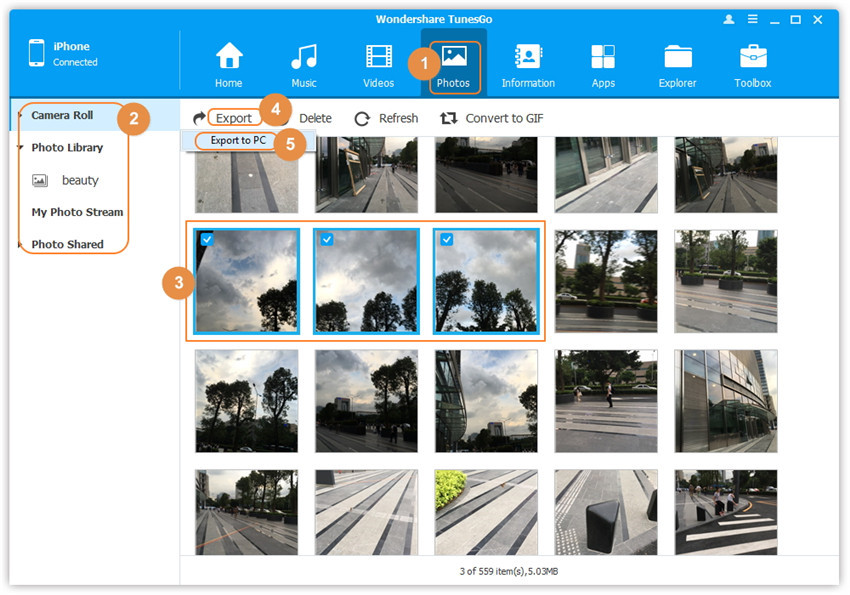
You can click on the “Photos” icon at the top of the main interface, and you will enter the default photo type: Camera Roll.

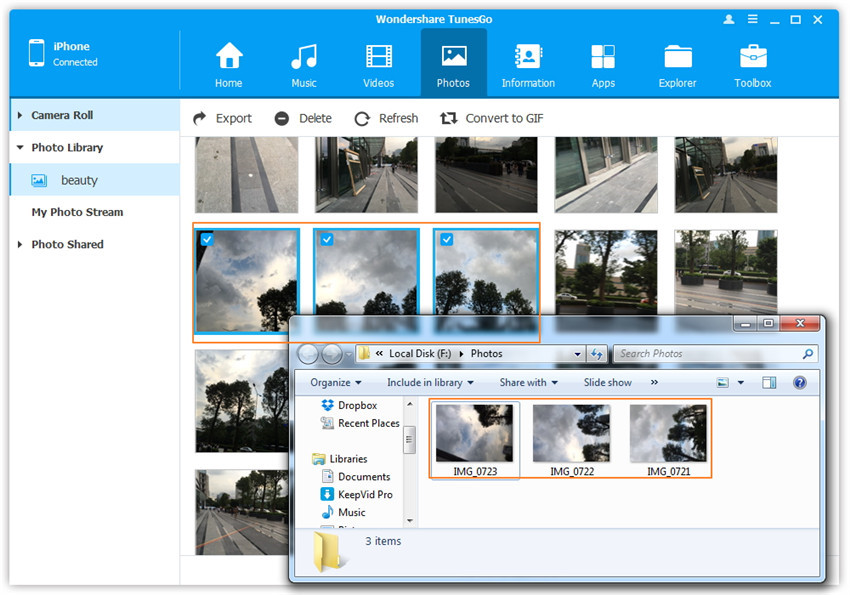
a) Transfer Photos from iPod to Computer Selectively
Step 3.Export Photos from iPhone 7 to Your Windows PC/Mac
a. Select a specific photo type under Camera Roll/Photo Library/ Photo Stream/Photo Shared to enter the album window, then select which one you want and click “Export” > “Export to PC” from the drop down list.
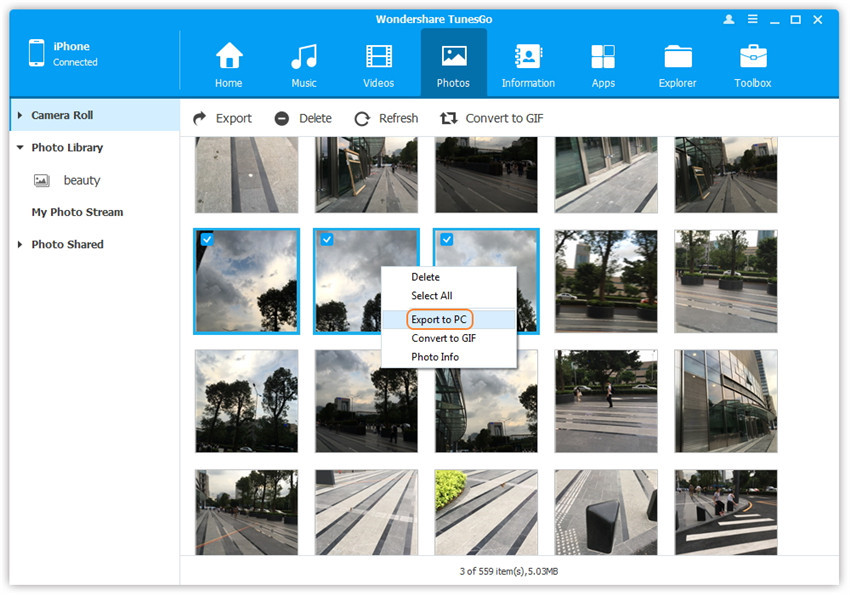
You can also right-click on the selected photos then click “Export” > “Export to PC” button.
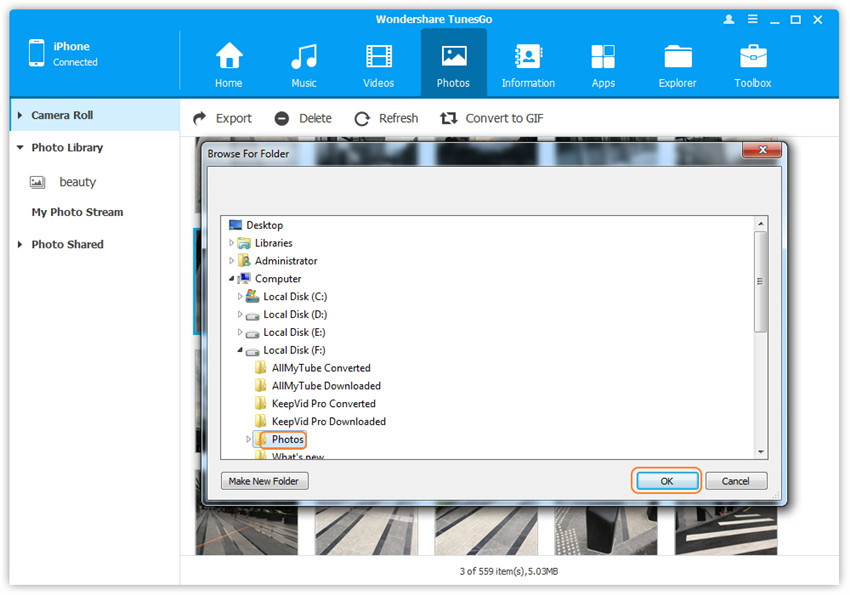
b. Browse and choose the target folder on your Windows PC/Mac to export. At last, click “OK” to start the export process.
Step 4.Export/Transfer Pictures from iPhone 7 to Computer
At an end, you can either click “Open Folder” to see the exported photos on your computer or click “OK” to close the dialog.
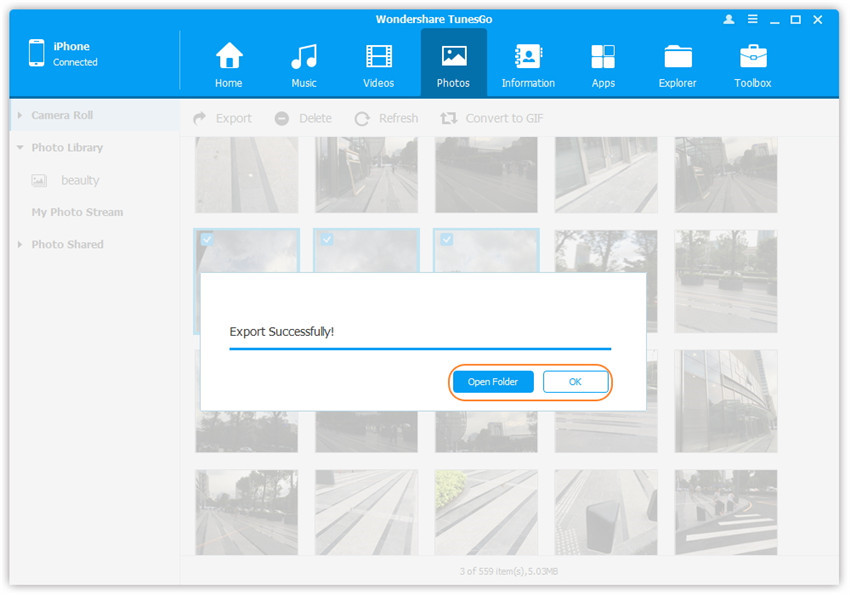
Now, you can check out your pictures on your computer.
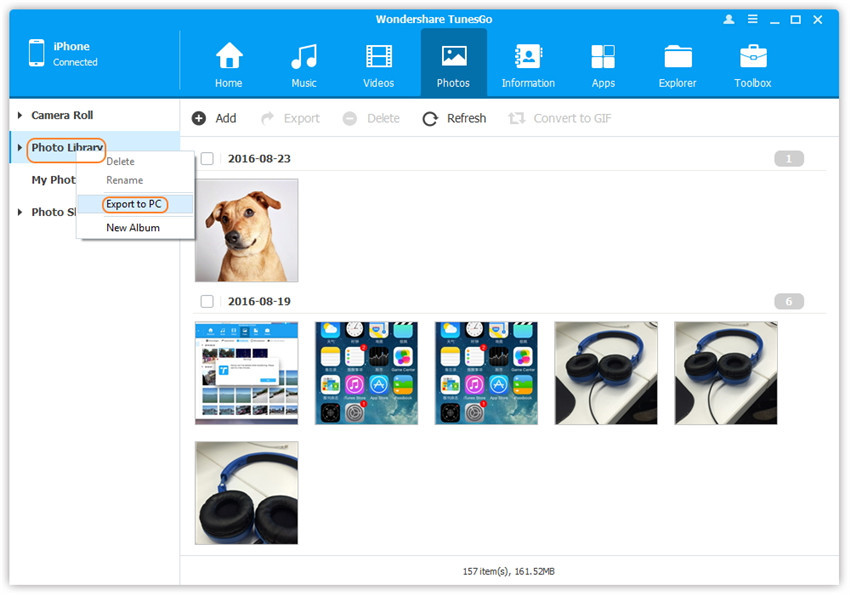
b) Copy All Photos in One Photo Type from iPhone 7 to Computer
Step 3.Choose A Specific Photo Type to Copy
Select a specific photo type: Right-click on Camera Roll/Photo Library/ Photo Stream/Photo Shared, and choose “Export to PC” from the drop down list. Now you can browse and choose the target folder on your window PC/Mac to copy.
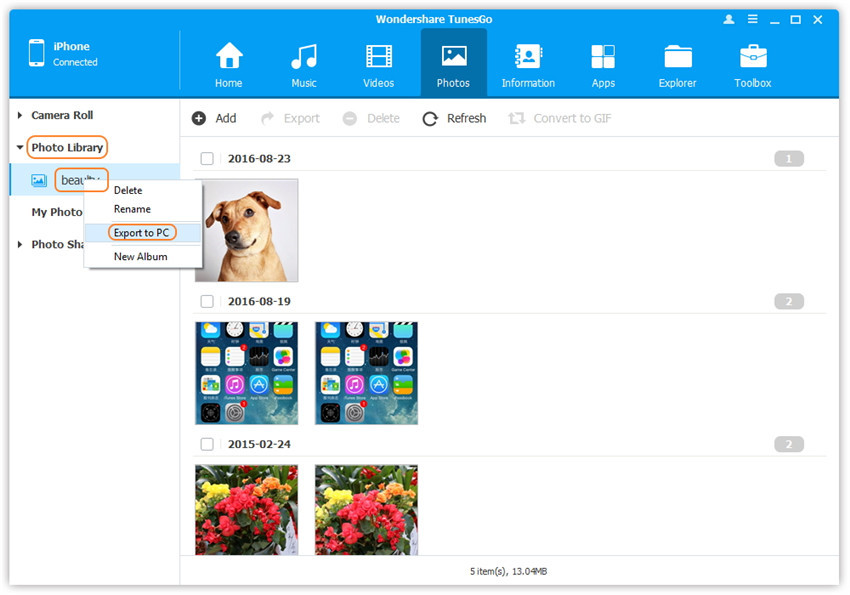
c) Transfer iPhone 7 Pictures to PC in One Photo Album
Step 3.Select A Specific Photo Album to Transfer
Select a specific photo album under Camera Roll, Photo Library, Photo Stream or Photo Shared: Right-click on it, next, click “Export to PC” from the drop down list. Here you can browse and select the target folder on your computer to transfer.
Method 1. Copy Images from iPhone/iPad/Android to iPhone 7(Plus)
Step 2.Choose Your Source Device
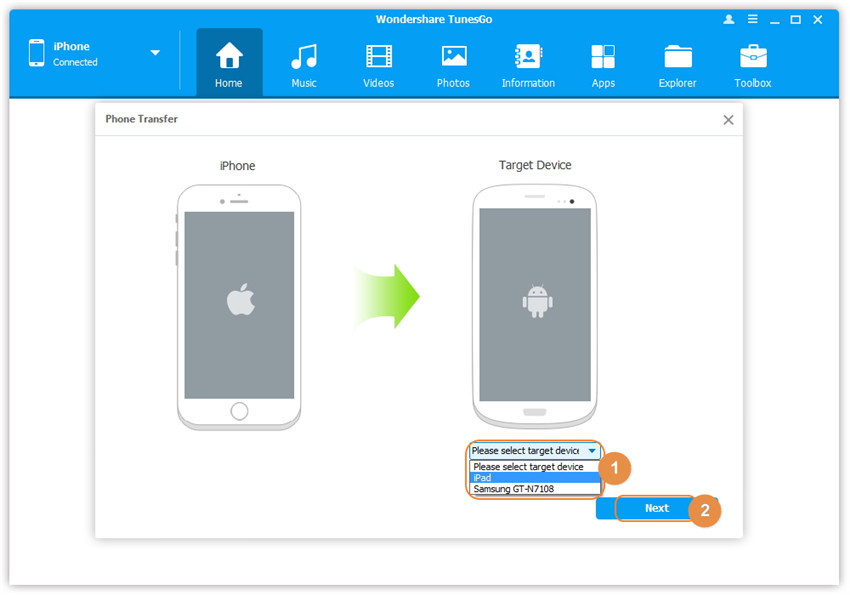
After connecting your iPhone/iPad/iPod/Android and iPhone 7(Plus) devices to the computer, you can choose your source device. Then click “Phone to Phone Transfer” option on the main interface.
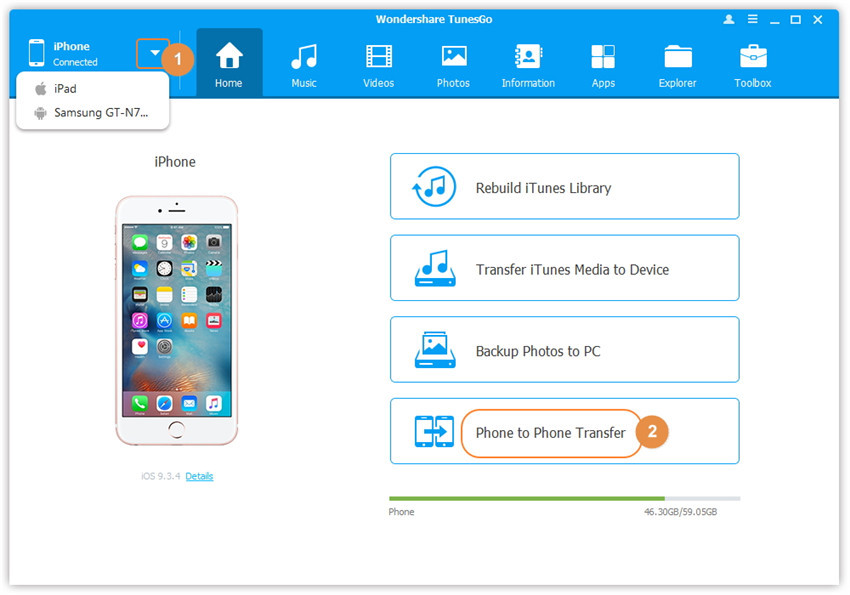
Step 3.Select Your iPhone 7(Plus) as Your Target Device
In the next step, select your iPhone 7/7 Plus as your target device from the drop-down list and click “Next” button to carry on.
Step 4.Transfer Images from iPhone/iPad/Android to iPhone 7
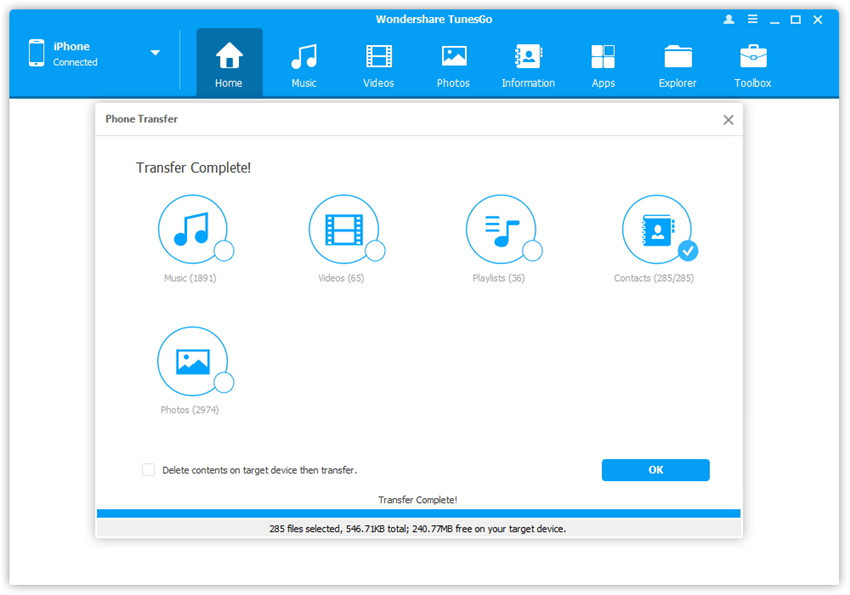
Music, Videos, Playlists, Photos, Contacts are supported to transfer by the program. Here you can select “Photos” and untick the other, and then click “Transfer” button to start transferring.

Once the transfer process is complete, click “OK” to end it.
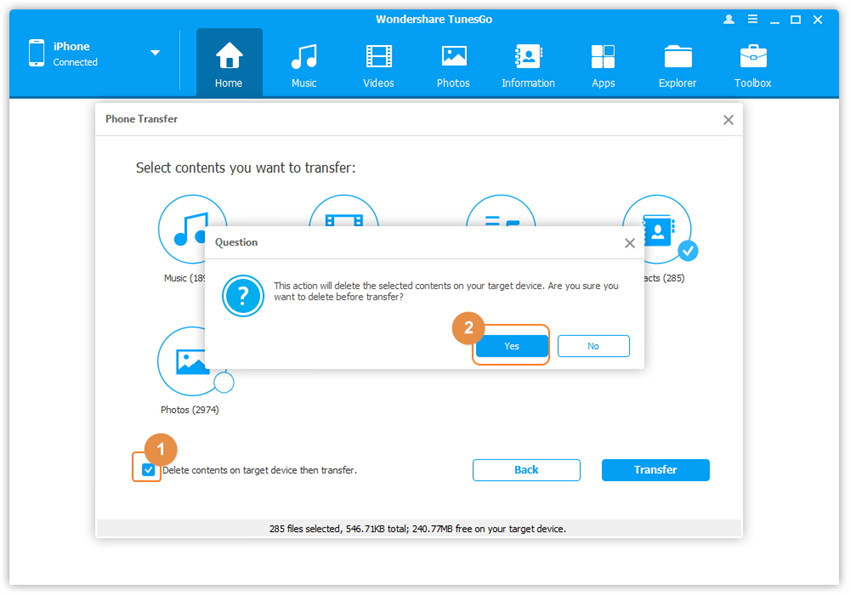
If you tick the “Delete contents on target device then transfer” option before transferring, everything on your iPhone 7/7 Plus will be erased before transferring.
Method 2. Selectively Transfer Images from iPhone/iPad/Android to iPhone 7
Step 2.Transfer Images to iPhone 7 from iPod/iPad/iPhone/Android
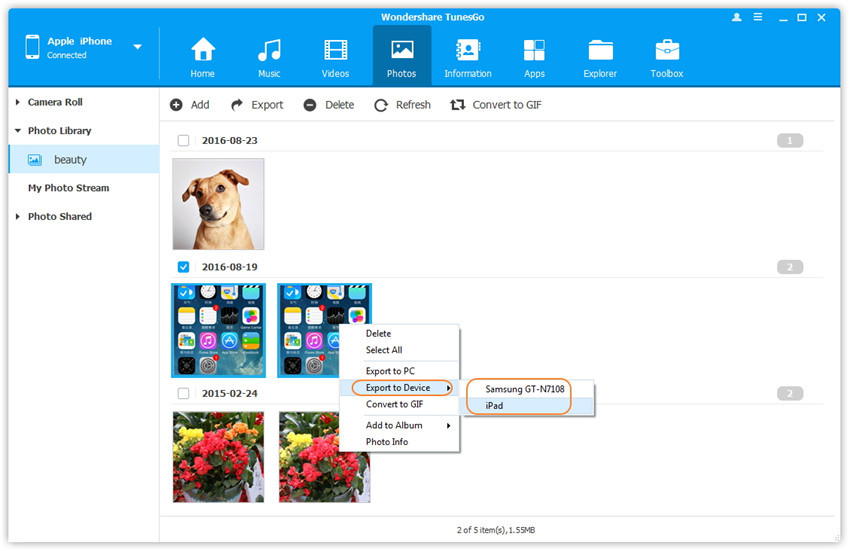
Make sure your source device after connecting your iPhone/iPad/iPod/Android to PC. Select “Photo” tab and choose a specific photo type: Camera Roll/Photo Library/ Photo Stream/Photo Shared( Camera Roll is the default type). Next, select a specific album under the photo type to enter the album window, select photos which you want to transfer from iPhone/iPad/Android to iPhone 7(Plus). Finally, click “Export” > “Export to Device” > choose your iPhone 7/7 Plus.
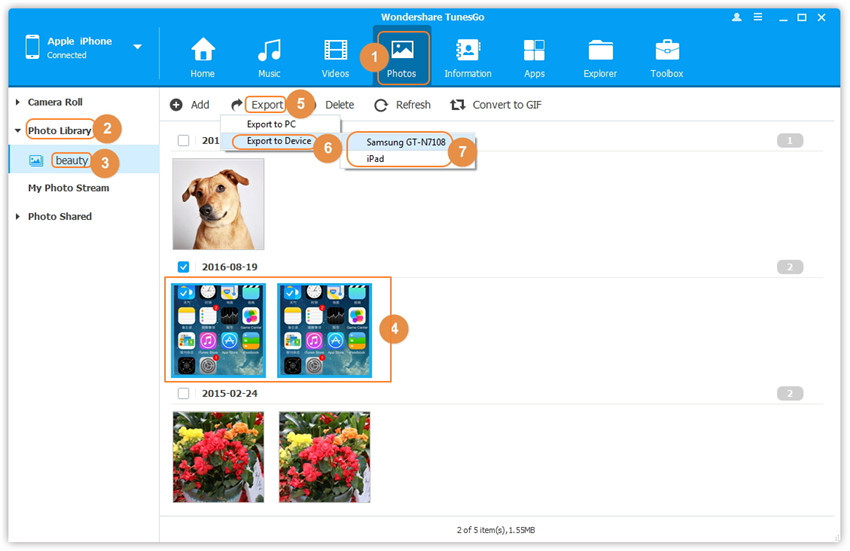
Or you can right-click on the selected photos and then click “Export to Device” > select your iPhone 7 device.
Related Articles:
How to Transfer Videos from Computer to iPhone 7/7 Plus
How to Backup and Restore Photos from iPhone
How to Recover Lost Photos from iPhone after iOS 10 Update
comments powered by Disqus