iPhone Data Recovery
 Phone to Phone Transfer
The easy 1-Click phone to phone data transfer to move data between iOS/Android/WinPhone/Symbian
Restore-iPhone-Data Products Center

 Android Data Recovery
The Easiest Android data recovery software to recover Android lost or deleted Files
 Phone Manager(TunesGo)
Best iOS/Android phone manager tool to manage your phone’s files in a comfortable place
 Phone to Phone Transfer
The easy 1-Click phone to phone data transfer to move data between iOS/Android/WinPhone/Symbian

iOS Toolkit
A full solution to recover, transfer, backup restore, erase data on iOS devices, as well as repair iOS system and unlock iPhone/iPad.

Android Toolkit
All-in-one Android Toolkit to recover, transfer, switch, backup restore, erase data on Android devices, as well as remove lock screen and root Android devices,especially Samsung phone.
[Summary]: Having problems with iOS 11? Learn how to downgrade your iPhone, iPad from iOS 11 back to iOS 10.3.3/iOS 10 or iOS 9 with our step-by-step guide.
iOS 11 has a lot of new features, such as Siri support third party App instructions, FaceTime support group video calls, maps have greatly improved and support indoor navigation and so on. As soon as it is released, I believe that many people can not wait to install a new iOS 11 on the iPhone 7/7Plus, iPhone SE, iPhone 6s/6s Plus, iPhone 6/6 Plus, iPhone 5s, iPad devices.

People are interested in:
* How to Recover Lost Data After Downgrade iOS 11 to iOS 10
* How to Restore Lost iPhone Data after iOS 11 Update
After upgrading to iOS 11, you may be plagued with iOS 11 failures and bugs, such as battery problems, locked screen issues, running problems with applications, or other problems that cause many ordinary iOS 11 users go back to iOS 10.3, iOS 10.2, iOS 10.1, iOS 10, iOS 9.3.5, etc,.
If you have the same error and want to return a stable and reliable iOS 10.3/iOS 10.2/iOS 10 / iOS 9.3, there is a solution. Removing iOS 11 (or any other previous iOS version) and downgrading to iOS 10.3 / iOS 9.3 is relatively simple, only if you can find the corresponding iOS 10.3 or any earlier version of IPSW files. You can downgrade iOS 11 reasonably easily as iOS 10 to iOS 9 downgrade. Below are two ways on downgrading iOS 11 to iOS 10.3, iOS 10, iOS 9.3 with or without iTunes.
Tip: As with any iOS update and downgrade, you should be careful to back up all your data and settings in case of any data loss after you switching to another iOS version.
Step 1. Firstly, visit ipsw.me to check the iOS 10.3, iOS 10.2.1 or iOS 10.1, iOS 9.3.5 ipsw file for your iPhone iPad then download the file to your Windows or Mac.
Step 2. Turn off Find My iPhone. (Settings → iCloud → Find My iPhone.)

Step 3. Connect your iOS 11 iPhone to your Mac or computer and launch iTunes, then go to the device Summary.
Step 4. Put your iPhone iPad into recovery mode by pressing and holding the power & home buttons for 10 seconds. Release only the power button and wait until you see Connect to iTunes.

Step 5. Release the Home button. And now hold the Option+Command key on the Mac or the Shift key on Windows then click on ‘Restore iPhone’ on iTunes.

Step 6. Locate and select the IPSW file which you have just downloaded.
When the downgrade process completed, you will see the usual setting up page. You know, the Hello screen, entering Apple ID account, etc.
To be honest, the biggest drawback of this method is to cause your data to be lost if you have not backed up before.
Want to downgrade iOS 11 back to iOS 10/iOS 9 without losing any data? Surely you can! Here comes out with iOS System & Data Recovery software, with it, you can fix iOS system to normal state and restore the iOS system to a previous version, that is to say, you can easily downgrade iOS 11 to iOS 10.3, iOS 9.3 on iPhone iPad by using this iOS System Recovery. The tool features in fixing any kinds of iOS system issues like iPhone/iPad stuck in recovery mode, DFU mode, Apple Logo, black screen, white screen or looping on start etc. No data loss at all.
Step 1.Run the Program on Your Computer
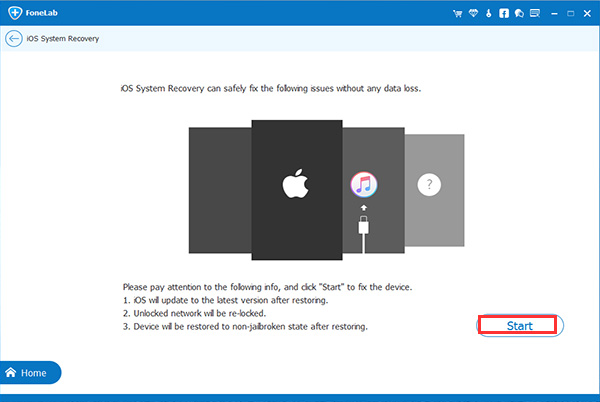
To start with, download, install and run the iOS System Recovery program on your PC or Mac. Then connect your iOS 11 iPhone/iPad to the computer via its USB cable and locate the “iOS System Recovery” feature under “More tools” function, then click “Start” to begin the iOS fixing process.


Step 2. Detect iPhone/iPad Device
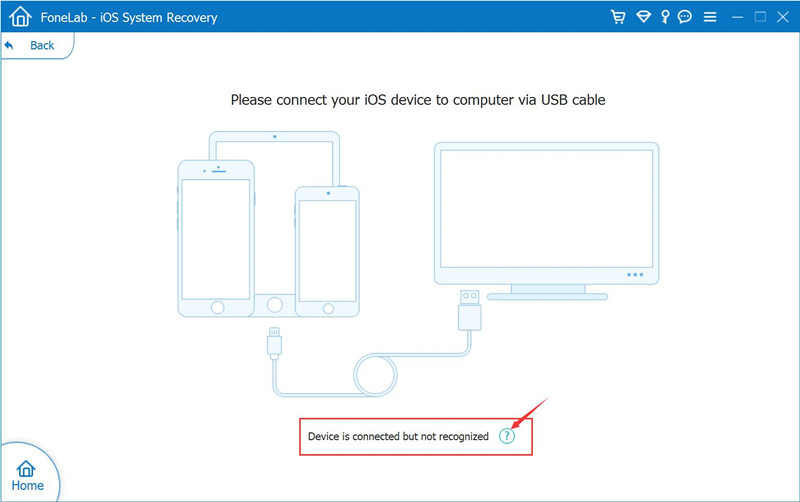
Note: If your iPhone is in abnormal iOS state, it will be detected with this iOS system recovery program very soon. Or it will prompt you that “Device is connected but not recognized”.

Situation A: If your iPhone is fine without any iOS system errors, the program will guide you to get the device into the Recovery Mode with the steps following.
How to Boot iPhone into the Recovery Mode or DFU Mode:
Click “Question” button and it will provide you with a guide to get your device into Recovery or DFU mode.
For iPhone 6S and Older Version:
1.Power off your iPhone.
2.Press and hold the Power button and the Home button together for 10 seconds.
3.Release the Power button and keep holding the Home button until the device is in DFU mode.

For iPhone 7 or iPhone 7 Plus:
1.Turn off the iPhone 7 device and connect it to computer.
2.Press and hold the Side and Volume Down buttons at the same time.
3.Keep holding them until you see the “connect to iTunes” screen, it mean device be putted into recovery mode, at this time the program will detect it.

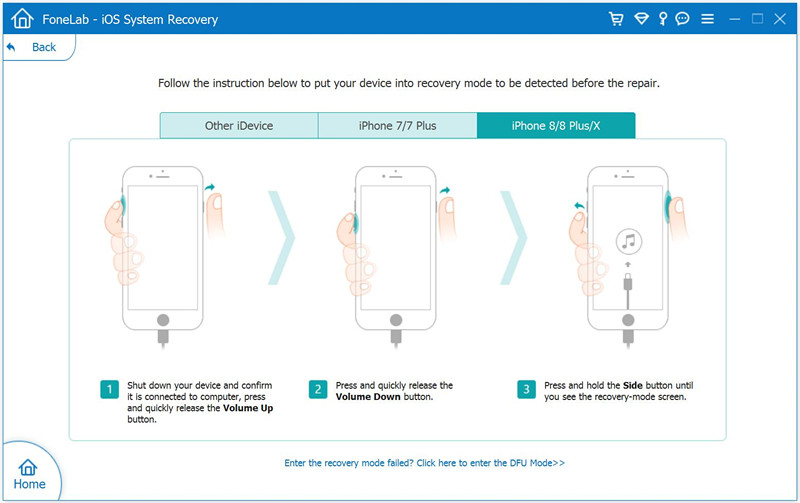
For iPhone 8/8 Plus and iPhone X:
1.Shut down your device and confirm it is connected to computer, press and quickly release the Volume Up button.
2.Press and quickly release the Volume Down button.
3.Press and hold the Side button until you see the screen shows iTunes logo screen appear(recovery-mode screen status).

After this, the device has been got into the Recovery Mode. Now you can go to step 3, to download iOS firmware to install it for downgrading your phone.
Solution B: If your iPhone/iPad got into the abnormal state when you try to download the device from iOS 11 to iOS 10/iOS 9, for instance, the device stuck in the Recovery Mode, stuck at black screen or others. Just connect the iPhone to the computer and click “Start”, the program will quickly detect your device is in the abnormal state. Click “Confirm” and go to the step 3 to download iOS firmware to install it for downgrading your phone.
Step 3.Select Device Model & iOS Firmware and Download it
Here you can download the firmware for your iPhone iPad. The tool will recognize your device, providing the most compatible iOS version for you to download. Click “Download” and go on.

Manually add the downloaded iOS 10/iOS 9 IPSW file to iOS System Recovery software:
If you have downloaded the IPSW file in previous, please select the IPSW file you downloaded and add it to the program, using for downgrading iOS 11 to iOS 10/iOS 9 on your iPhone/iPad device without data loss.
Add IPSW files to the program:

Follow the links and download the iOS Firmware files:
iOS firmware file for iPhone
iOS firmware file for iPad
iOS firmware file for iPod touch
Step 4.Downgrade iOS 11 to iOS 10/iOS 9 without Data Loss
Now the iOS downloading process will start automatically. Finally, the system will complete the operation with only a few minutes. When it done, your iOS device will be return to iOS 10/iOS 9 without any data loss.

Read and check the following listed iOS problems, which can be handled and fixed well by iOS System Recovery:
-Stuck in recovery mode or iTunes logo
-Unable to get out of DFU mode
-White Apple logo screen/White screen of death
-Black screen, red or blue screen
-Reboot loop
-Frozen screen and doesn’t respond at all
-Slide Not Working
-The Apple logo keeps looping
Additionally, this professional software can also recover deleted or lost data on iOS devices such as contacts, messages, call logs, pictures, videos, music, calendars, notes, apps , etc, no matter what caused the data lost.
Related Articles:
Fix iPhone Stuck on Apple Logo Screen after iOS 11 Update
How to Fix iPhone Stuck in Recovery Mode After iOS 11 Update
How to Recover Lost iPhone Photos after iOS 11 Update
Two Ways to Restore Lost iPhone Data after iOS 11 Update
8 Features to Know About the Rumored iOS 11 Update