
iPhone Data Recovery


The easy 1-Click phone to phone data transfer to move data between iOS/Android/WinPhone/Symbian
Restore-iPhone-Data Products Center

 Android Data Recovery
The Easiest Android data recovery software to recover Android lost or deleted Files
 Phone Manager(TunesGo)
Best iOS/Android phone manager tool to manage your phone’s files in a comfortable place
The easy 1-Click phone to phone data transfer to move data between iOS/Android/WinPhone/Symbian

iOS Toolkit
A full solution to recover, transfer, backup restore, erase data on iOS devices, as well as repair iOS system and unlock iPhone/iPad.

Android Toolkit
All-in-one Android Toolkit to recover, transfer, switch, backup restore, erase data on Android devices, as well as remove lock screen and root Android devices,especially Samsung phone.
[Summary]: Your iPhone data may be lost after the iOS 13 update. So in this article, you will find out the best way to upgrade your iPhone to iOS 13 without losing any data.
iOS 13 is finally here, are you impressed with the new features of iOS 13? Many people may be eager to experience new features. However, before you do this, you need to know that whenever there is a system upgrade, you could lose data if something goes wrong once the process starts. That’s why most experts agree to always back up your iPhone before upgrading to iOS 13/iOS 12.4/iOS 12/iOS 11. In the article you will learn about 3 different ways to back up your iPhone so that your phone data will not be lost after iOS 13 update, and you can find the one that works best for you.
When it comes to backing up your iPhone, people may immediately think of backing up your iPhone data via iTunes. If you have a computer and USB cable next to you, then you can follow the steps below.
step 1. Run iTunes and connect your iPhone to PC via a USB cable. (If a pop-up appears on the device screen asking for your device password or trusting this computer, follow the steps on the screen.)
Step 2. Select the iPhone icon in the top left corner, then select Summary and scroll down to the backup section.
Step 3. Click the “Back Up Now” button and the backup will start automatically.

Once you are done, you can view your backups: Open iTunes Preferences and select the Devices tab. You will see your backup here.
Cons:
1. The backup process is lengthy. If the file is large, you will take a long time.
2. You may encounter an unknown error during the iTunes backup process.
3. You cannot back up individual data files.
4. You cannot selectively back up or restore your phone data. In other words, you need to restore the entire backup, and these files are not previewable.
Backing up your iPhone or iPad via iCloud is another common official way for iOS users. It automatically backs up your data via a Wi-Fi network connection. However, each iOS user can only back up files up to 5GB for free. Once you reach the limit, you can purchase more memory, 50GB for $0.99/month, 200GB for $2.99/month, and 2T for $9.99/month. Here are the steps to back up your iPhone via iCloud.
Step 1. Connect your iPhone to a stable Wi-Fi network and go to Settings on your iPhone.
Step 2. Find your iCloud account. If your iPhone is running on iOS 10.2 or earlier, you will need to go to iPhone Settings > Scroll Down and select iCloud.
Step 3. Open iCloud Backup and click on “Back Up Now“.

Cons:
1. You can only backup camera roll, account, mail and settings on the iPhone, not all data.
2. iCloud backup is only effective if you have enough space and a reliable Wi-Fi connection.
3. You will not be able to selectively restore files to iPhone.
If you want to back up your iPhone data in case it’s lost, in addition to iTunes and iCloud, you can also back up your iPhone before updating to iOS 13 via a third-party app. It is highly recommended to use the iOS Data Backup & Restore program to help you back up your iPhone to your computer in one-click or selective mode. It can back up up to 16 types of data, including photos, contacts, SMS messages, notes, e-books, call logs, music, videos and more. iOS Data Backup & Restore allows you to back up your iPhone with one click or selectively back up your iPhone data to your computer. After that, you can restore individual data to the iPhone without deleting existing files on your phone. The iOS Data Backup & Restore software supports iPhone XS/XS Max/XR/X/7/7 Plus/6S/6S Plus/6/SE, as well as the latest iPhone 11, iPhone 11 Pro and iPhone 11 Pro Max.


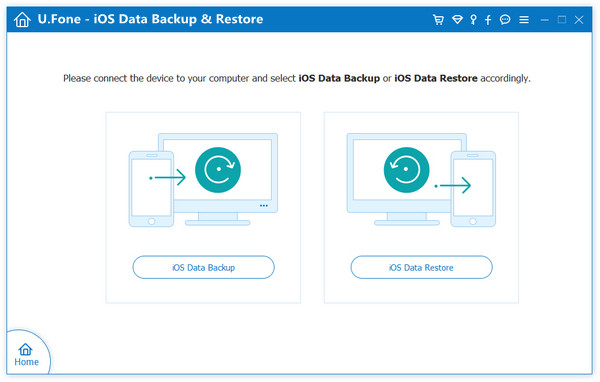
Launch the iOS Data Backup & Restore home page and find the iOS Data Backup & Restore option. Please connect your iPhone device to your PC. If it asks you to click on the trust to get the connection, follow it.

You have 2 choices: iOS Data Backup and iOS Data Restore. In this case, you should choose the backup function and go to the next step.
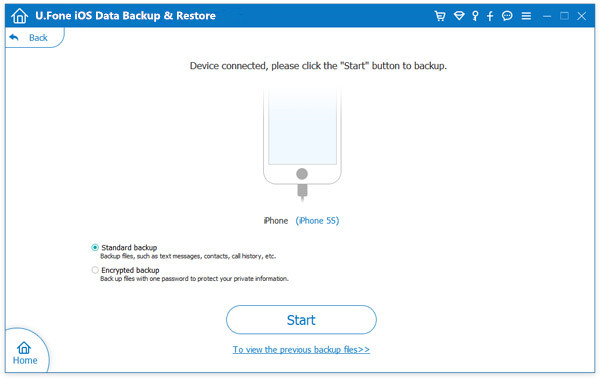
If you tend to protect the data on your iPhone, it is recommended that you check “Encrypt Backup”, which requires you to set a password for the backup. If not, select “Standard Backup” and continue.
As the screen shows, you are supported to back up multiple data types, please tick the content you need to back up, then click “Next”, the backup will start right away, please wait.
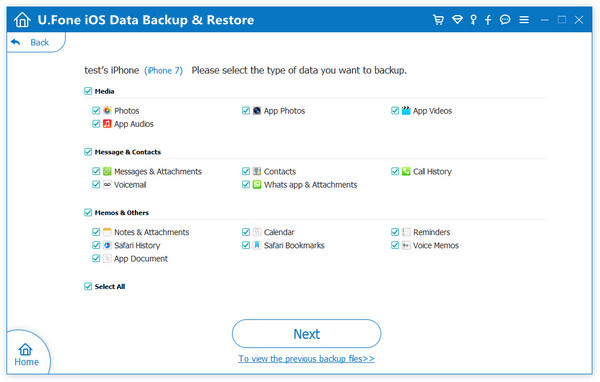
Note: Keep your device connected to your computer during the backup process.
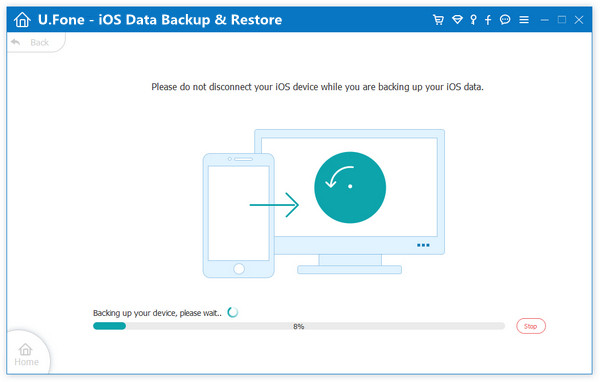
The backup is completed immediately and the name and size of the backup file will be displayed. If you need to check the contents of the backup, please click “View Now”.

How to Install iOS 12 on iPhone iPad without Losing Data
How to Downgrade iPhone from iOS 13 Beta to iOS 12.3.1
How to Install iOS 13 Beta Right Now
How to Fix iOS 13 Update Bricked My iPhone/iPad


