iPhone Data Recovery
 Phone to Phone Transfer
The easy 1-Click phone to phone data transfer to move data between iOS/Android/WinPhone/Symbian
Restore-iPhone-Data Products Center

 Android Data Recovery
The Easiest Android data recovery software to recover Android lost or deleted Files
 Phone Manager(TunesGo)
Best iOS/Android phone manager tool to manage your phone’s files in a comfortable place
 Phone to Phone Transfer
The easy 1-Click phone to phone data transfer to move data between iOS/Android/WinPhone/Symbian

iOS Toolkit
A full solution to recover, transfer, backup restore, erase data on iOS devices, as well as repair iOS system and unlock iPhone/iPad.

Android Toolkit
All-in-one Android Toolkit to recover, transfer, switch, backup restore, erase data on Android devices, as well as remove lock screen and root Android devices,especially Samsung phone.
Are you experiencing the following problems:
Wi-Fi not working on Samsung Galaxy S7 or Galaxy S7 Edge?
Enable to connect to Wifi or Wifi dropping constantly?
Wifi connected but internet wont work?
Wifi issues with Samsung Galaxy S7?
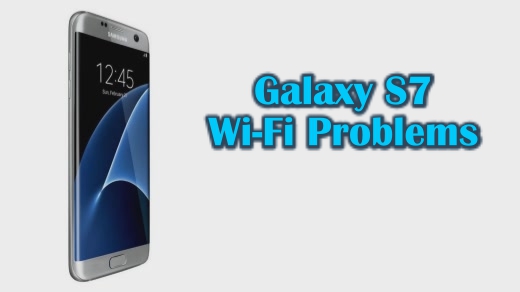
Recently quite a few users of Galaxy S7 Edge have faced issues with Wi-Fi connection and Bluetooth Connectivity issues in the Samsung Galaxy S7 and S7 edge.
This is not surprising because the problems such as poor connection, a connection that keeps dropping and not being able to connect to a Wi-Fi network at all are pretty common no matter which smartphone you own. If you face Samsung Galaxy S7 Edge Wi-Fi issues, try the solutions below. Here we are going to share some simple tips and tricks that can be taken to fix Wi-Fi connection problem on Galaxy S7 and S7 edge.
The first thing you should try if this happens is to reboot your Samsung phone.
Step 1. Press and hold the power button until a menu pops up.
Step 2. Tap the “Restart” button to reboot your Samsung Galaxy S7 phone.
Step 3. Wait for the device to shut off and then power back on its own.
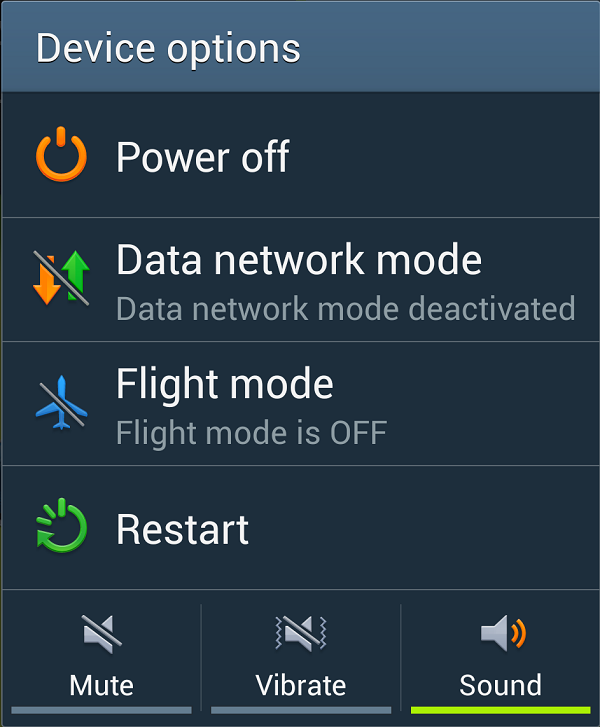
Once your lock screen appears again, your Samsung Galaxy S7/S7 Edge is successfully rebooted. This tip is likely going to fix the majority of Wi-Fi issues that your S7 or S7 edge has run into: a simple restart of all the devices involved.
If your Galaxy S7/S7 Edge faces connectivity issues with more than just one Wi-Fi network, I will recommend you to reset the network settings on the handset once:
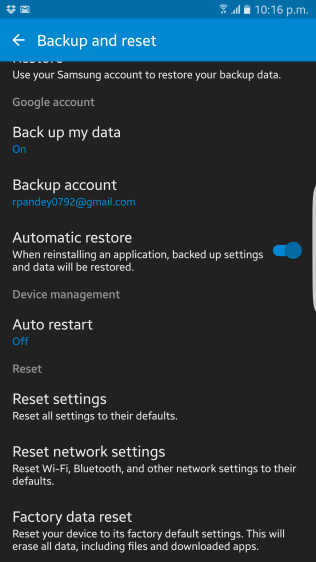
Launch Settings -> Backup and reset and selecting the ‘Reset network settings’ option. Do note that this will lead to your Bluetooth and mobile networks settings being reset to their default settings as well.
Here is another solution, reseting your router may fix your Samsung Galaxy S7 Wi-Fi connection problem.
If the above tips did not work for you, its time to take things to the next level. If the Galaxy S7 is the only device in your Wi-Fi network to suffer from slow speeds, you can try changing the DNS server used on the handset.
Step 1. Make the device forget the existing Wi-Fi network.
Step 2. Tap on its name to join again (before you enter the password, tap on ‘Show advanced options.’).
Step 3. Tap ‘IP Settings’ and select ‘Static’ from the list. Leave other IP settings as they are, and simply enter the DNS server you’d like to use in the DNS text field area. You can try using Google DNS first (8.8.8.8, 8.8.4.4) or OpenDNS (208.67.222.222) to see if they fix the Wi-Fi woes on your S7 or not.
If the above steps did not work for you, your last resort will be do to a factory reset on your Galaxy S7/S7 Edge device. However, this will erase all files and settings on your Samsung phone. If even after the reset, your Galaxy S7 refuses to connect or work properly with a selected few Wi-Fi networks, I will recommend you to take your Galaxy S7 to a Samsung service centre and ask for a replacement/repair.
Samsung Galaxy S7 or S7 Edge makes it easy to return your phone to factory settings. To do so, go to Settings > Backup & reset > Factory data reset.
Samsung Data Recovery is a good helper for us to recover lost files from your factory reset Samsung S7/S7 Edge. With this tool, Samsung users are empowered to recover lost videos, contacts, photos, text messages, WhatsApp chats and more from Samsung Galaxy S7/S6/S5/S4, Galaxy Note 7/5/4/3, Galaxy A7/A8/A9/J7 or other Samsung phone or tablets. Besides, the program can be used to backup your Samsung data to window PC then restore to your device from bakup at any time.
Step 1.Launch the Program after Installing
Download the software to your computer, install and run it. In addition, connect your Galaxy S7/S7 Edge with the USB line to your computer.
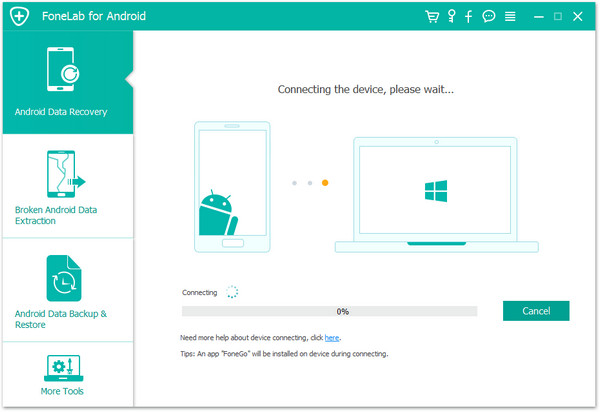
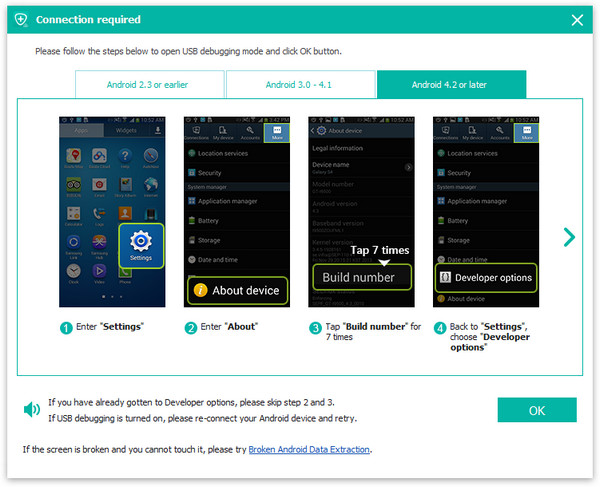
Step 2.Enable USB Debugging on Your Galaxy S7
Please open the USB debugging on your Samsung Galaxy S7 phone. Steps are as follows:
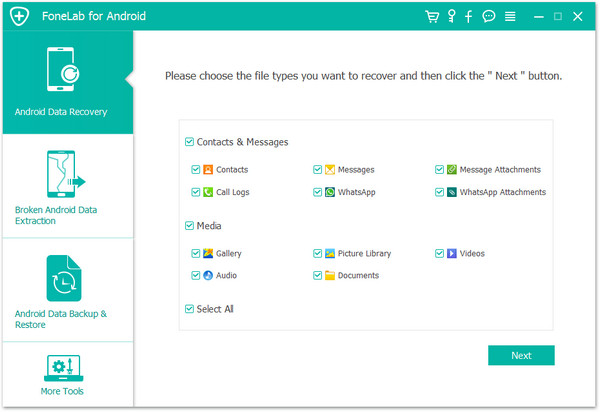
Step 3.Scan Lost Data on Galaxy S7
Next, the program will scan your Galaxy S7 for all lost data, such as “Contacts”, “Messaging”, “Messages Attachment”, “Call Logs”, “Gallery”, “Videos”, “Audio” and so on. You can choose the one you want to recover and click “Next” button.
Please click “Allow” on your phone’s main screen and click “Start” in the program window.
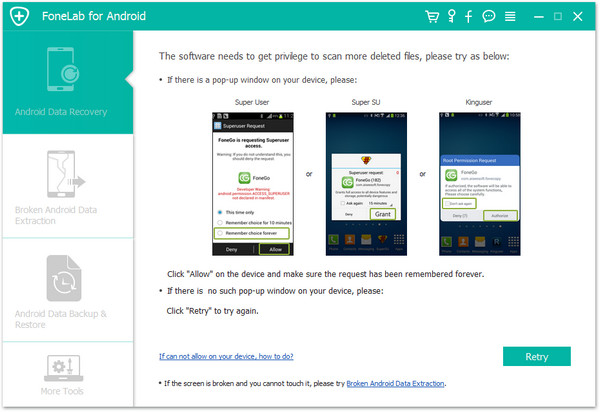
Then the program will start browsing your missing files.
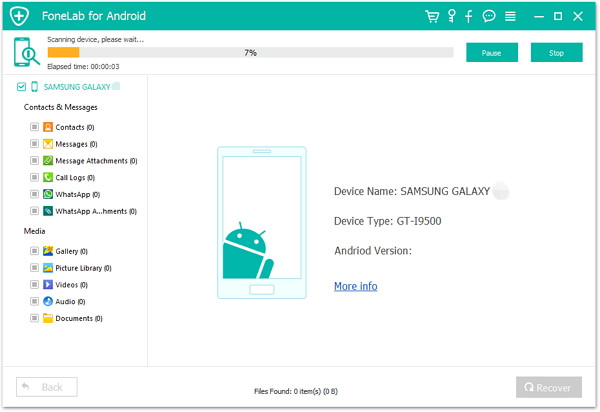
Step 4.Preview and Recover Data from Galaxy S7 after Factory Reset
If the scanning process is complete, all the files will be displayed as shown below. Please accord to your need to check your file to restore. Click on the lower right corner of the “Recover”. Waiting for a while, the recovery process is completed.

Related Articles:
USB Connection Not Working on Samsung Galaxy S7/S6
Samsung Galaxy S7 Edge Explodes in the Philippines
Galaxy Note7 Recall-How to Prevent Battery from Exploding
Samsung Galaxy Won’t Turn On: How To Fix The Problem
comments powered by Disqus