iPhone Data Recovery
 Phone to Phone Transfer
The easy 1-Click phone to phone data transfer to move data between iOS/Android/WinPhone/Symbian
Restore-iPhone-Data Products Center

 Android Data Recovery
The Easiest Android data recovery software to recover Android lost or deleted Files
 Phone Manager(TunesGo)
Best iOS/Android phone manager tool to manage your phone’s files in a comfortable place
 Phone to Phone Transfer
The easy 1-Click phone to phone data transfer to move data between iOS/Android/WinPhone/Symbian

iOS Toolkit
A full solution to recover, transfer, backup restore, erase data on iOS devices, as well as repair iOS system and unlock iPhone/iPad.

Android Toolkit
All-in-one Android Toolkit to recover, transfer, switch, backup restore, erase data on Android devices, as well as remove lock screen and root Android devices,especially Samsung phone.
[Summary]: The iTunes/iPhone Error 14 is an error that displays when restoring or upgrading their iPhone to the latest iOS 13. Here we provide you the most effective solutions to fix iTunes error 14 or iPhone error 14.
The latest iOS 13 system has been released, and more and more iOS phone users are updating to iOS 13 via their iPhone or iTunes. In general, everything will go smoothly. However, some users complained that they encountered the error message “iPhone Could Not Be Updated. Error 14” when updating to iOS 13. This error disconnects the update. The real cause of the error has not been found yet. We suspect that it may be due to faulty iTunes installation; corrupt Windows’ registry files; anti-virus program marks iTunes as a threat; a virus which is attacking iTunes or corrupt or missing iTunes files.
Is it possible to fix iTunes Error 14 without data loss?
iTunes error 14 (iPhone Error 14) is possible to come across iTunes error 14 warning when upgrading (iOS 13.2/12.4) or restoring your iDevice via iTunes, which is similar to iTunes error 9006, iTunes error 3194, iTunes error 1671 etc. As a result of this error, iTunes crashes, an error message is shown, and iTunes will forcibly close.
If you are unfortunate enough to encounter iTunes error 14/ iPhone Error 14 error and cannot update to iOS 13 or restore your iPhone iPad, there are several fixes available and we’re going to walk you through them. Follow the tips below to fix iTunes Error 14 or fix iPhone Error 14 issue and return your iPhone to the normal state.
This is the safest and easiest way to fix iTunes Error 14 issue. No matter what kind of problem, all can be easily fixed by using iOS System Recovery. iOS System Recovery allows iPhone users to fix iOS system to normal, such as iTunes error 14, iTunes error 9, iPhone stuck in Apple logo/black screen of death, iPhone gets stuck in recovery mode and more iPhone errors or iTunes errors. Importantly, it solves this error without losing any data such as contacts, messages, videos, and images. And it is fully compatible with almost all iPhone devices, including the iPhone 11, iPhone XS, iPhone X, iPhone 8, etc.
Launch the iOS System Recovery program after downloading it on your computer. Now, select ‘iOS System Recovery‘ option from the main menu.

iOS System Recovery can safely fix 50+ issues without any data loss, such as black screen of death, Apple logo screen, stuck in recovery mode, iTunes error 14, etc. Click on “Start” and connect your iPhone to the program.

You have 2 repair modes: Standard Mode and Advanced Mode. The former can repair your device and the data will not be deleted. The latter will completely delete your data. Select a fix mode and click on “Confirm”

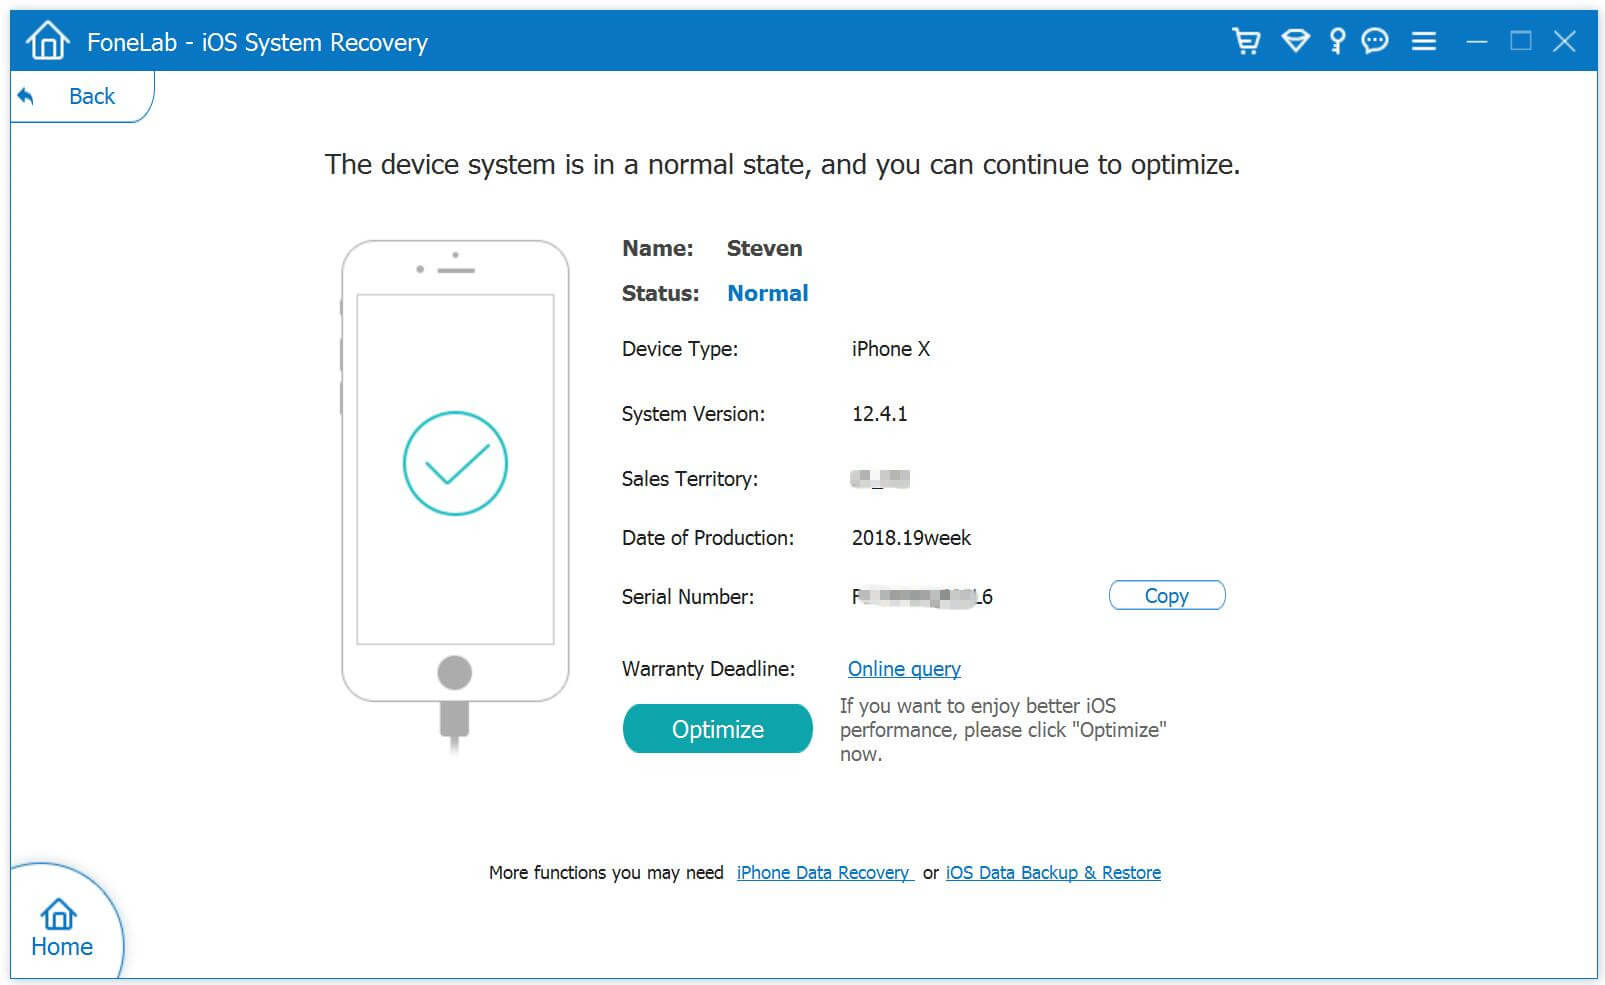
The program will detect and scan your device, and if your iPhone is all right, you will get such a screen. Click on “Optimize” and you can enjoy better performance.

Tip: You can also update or downgrade your iOS system without data loss by clicking the “Optimize” button.
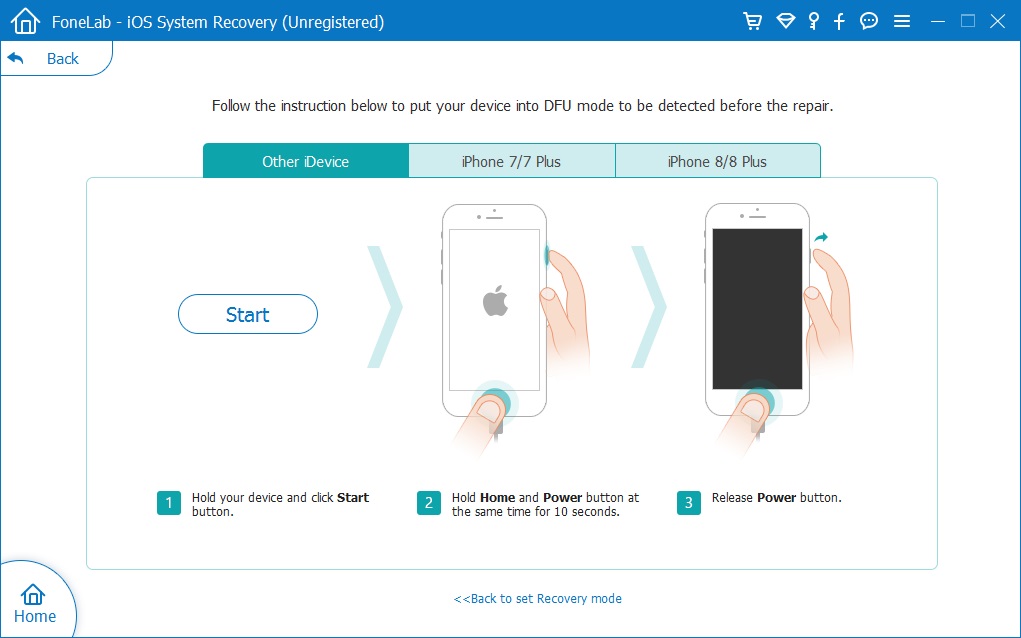
If your device is detected to be in an abnormal state, you will need to put your iPhone into DFU mode or recovery mode, then download the appropriate firmware package to fix iTunes/iPhone error 14 issue.
Follow the instruction below to put your device into DFU mode to to be detected before the repair.

Or you can follow the on-screen instructions to put your iPhone into recovery mode. The steps are different from the above, please handle them carefully.

The program will detect your iPhone model, and then it will detect the latest firmware to download as well. Now start downloading the firmware to fix error 14 without losing phone data.

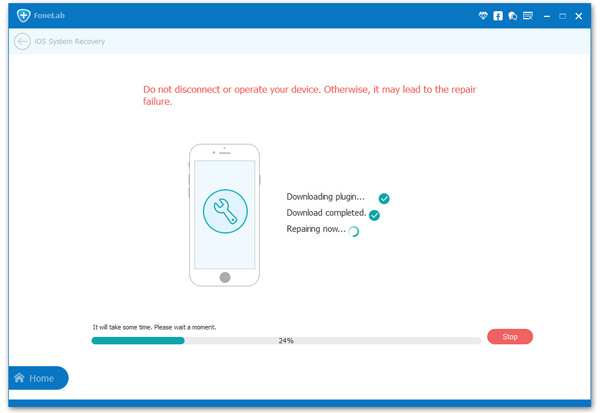
As you can see, the program starts downloading firmware package for repairing your abnormal device. Please wait a moment. Keep your device connected to your computer during the download process.

The benefit of this tool is the removal of complex steps and everything is done automatically. After the download is complete, just press “Repair” and the iOS System Recovery tool will automatically start repairing your device. After the completion, your iPhone can be used normally.

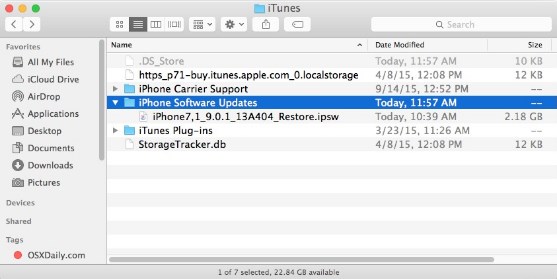
In some cases, the upgrade file for your device was not successfully downloaded. If iTunes isn’t recognizing the IPSW file or an update isn’t working, deleting the IPSW file from your computer forces iTunes to download a new IPSW file the next time you try to update. Then you may fix the issue. Follow the steps to remove the IPSW file to fix iTunes error 14.
1.1 Locate the IPSW file on your Mac/Windows PC
macOS: iPhone~/Library/iTunes/iPhone Software Updates or iPad~/Library/iTunes/iPad Software Updates or iPod touch~/Library/iTunes/iPod Software Updates
Windows XP: C:\Documents and Settings\\Application Data\Apple Computer\iTunes\iPhone Software Updates
Windows Vista,7 and 8: C:\Users\\AppData\Roaming\Apple Computer\iTunes\iPhone Software Updates
Windows 10: C:\Users\USERNAME\AppData\Roaming\Apple Computer\iTunes\

Find the corrupted or damaged firmware files and delete the IPSW file immediately. Once the file is deleted, the iTunes software will be prompted to download the firmware again.
1.2 Download .ipsw from www.ipsw.me and restore via iTunes
> After deleting .ipsw file/files, visit https://ipsw.me/ and choose your product.
> Then select your device model and version.
> Click on “Download” button.
> Then connect your iPhone using the same path and restore your iDevice while following the iTunes prompts.
> Check if the iTunes error 14 is fixed or not.
The process is simple. Here are the steps to reset iPhone 11/XS/X/8/8 Plus, iPhone 7/7 Plus, iPhone 6 and the earlier models.
Reset iPhone 6s and earlier models:
Press and hold the Sleep/Wake and Home buttons simultaneously for at least ten seconds. After about ten seconds, you should see the Apple logo and can release the buttons.
Hard Reset iPhone 7 and iPhone 7 Plus:
1. Press and hold the Sleep/Wake button + Volume Down button for 10 seconds until the screen goes dark and an Apple logo appears on the screen.
Hard Reset iPhone 8 and latter:
Press and quickly release the Volume Up button. Then, press and quickly release the Volume Down button. Finally, press and hold the Side button (aka power) until you see the Apple logo screen.
Fix iPhone Stuck in Recovery Mode When Upgraded to iOS 13
How to Fix iOS Update Errors and Restore Updates in iTunes
Fix Stuck iPhone during iOS 11 Upgrading/Downgrading
Can’t Restore iCloud Backup after iOS 11 Update? Fix Here
How to Back Up Your iPhone before Upgrading to iOS 13